Archive for the ‘DIY’ Category

Sew to celebrate!

June 19, 2010

Now that summer is happening, it is time to catch up on some vitamin D and spend some time with family and friends. Spontaneous picnics in the park or eating dinner outside will always bring the warm fuzzies and keep your life rich. And while you are at it, why not add some color? I always have a blanket on standby in my car…just in case the mood strikes. A Mexican blanket, my African mud-cloth throw, a tapestry, my hand-woven textile from Guatemala…and now, my own patch-work quilt! What is really fun, is when you have a gathering that calls for all of these blankets, resulting in an explosion of color to hang out on.

I went to my local ‘mom & pop’ fabric store and bought about $15 worth of scrap fabric. Fabrics that I probably would never buy otherwise. I cut them into triangular pieces and created a pattern.

Next step: start sewing them together! It is a project that can take over your life, but I ended up completing this one in under 2 days as I was looking for a serious distraction.

Once you find your sewing rhythm, you will see your blanket appear before your very eyes. I know it sounds strange, but as it grows, so does the adrenaline; and then you HAVE to finish it! I think I took this shot at 1am.

Once you finish sewing your scraps of fabric together, make some food, celebrate life and all of its colorful glory!

DIY Wall Mounted Head Board!

April 13, 2010

That’s right! While strumming through an Ikea Catalog, I found a modern/urban looking head board that I loved. Two problems, the size and the price. The Ikea photo shows 2 headboards, so the total cost would have been around $350, including taxes and extra parts. Um…Yeah. I don’t have that kind of change laying around. So I decided to get creative and build my own. I went to one of my favorite stores, Home Depot, and purchased a deep walnut stain (I know, not the greenest purchase and I’m normally so good!), some slabs of cedar wood (they will do up to 12 cuts for free) and screws. The total cost was just under $75.00! Sweeet!

The most important part of this entire process was devising a plan, writing it down and taking measurements (always measure twice, cut once!).

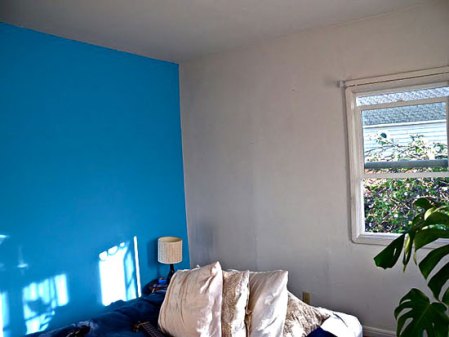
Here is a before photo:

OK! First things first! Stain the wood and let it dry over night.

Next, gather all your pieces and map it out. It’s muy importante that you use a level so it’s um….level.

Do not drill the screws in all the way until everything is set. I drill about 2/3 in and then finish at the end. Nothing worse than screwing up your screws and trying to take them all out from scratch.

And the finished product! Not only is it 3 times the size of the Ikea headboard, it’s custom to fit around my window and leave room for my nightstand and lamp. I love it!